Stuff you need to know!

Monday, April 30, 2012

Simple Stirfry

I once again visited my fabulous cookbook while my mother was visiting. A great time to try new recipes that may take a while to make...but that was not so in this case.  It was a very simple stir fry. You could of course expand on it, but sometimes, simpler is better.  And everyone loved it. Even my littlest one who has come over to steal the leftovers away from me now...

You need 15 minutes of marinating time. Of course, you can leave it longer if you have time earlier in the day.

I always buy the boneless pork chops for dishes requiring pork - either the thin butterfly halves, or the thicker ones, depending on what I'm making. Coop's 'Prix' brand has been working out quite well...you get a little more for your money and adding all the flavors, I think it tastes great (probably until I visit the US again and buy a better cut...but that's for later...)

I served this with white rice, however will make it with brown next time.  I have also doubled the sauce

What you need:
About 500g of pork - I used 560
2 Tbsp dry Sherry
2 Tbsp soy sauce
4 tsp sesame oil
2 tsp cornstarch
8 green onions (I used 7)
1 Tbsp peanut/vegetable oil
2 tsp sugar
salt and pepper to taste


In a bowl, combine the Sherry, soy sauce, sesame oil and cornstarch. Slice the pork into short, thick strips and add to the bowl. Let marinate a minimum of 15 minutes.


Heat a large frying pan or wok with the peanut/vegetable oil.

Cut the green onions diagonally (the entire onion) and set aside.

When the oil is steaming, add the pork mixture and liquid.  Fry until the pork is browned.  Add the onions, sugar, salt and pepper.  Continue to cook about 4-5 more minutes until the pork is done.


Remove immediately and serve.  Pour the juice into a small bowl to pour over the rice and pork mixture.

And it's that simple! Enjoy.


Tuesday, April 24, 2012

Steamed Buns in Zurich

I know I've said it before, but I'm really loving trying new recipes out here. Especially since Grandma (my mom) is here to play with the kids. It's definitely a lot easier to cook something new when you don't have kiddos hanging on you wanting your attention at the exact moment you are supposed to be doing 5 things at once.

I tried making these steamed buns for a few reasons.
1. Hubby likes them.
2. Thought I could entice my toddler to try something new by calling them rolls.
3. Dim Sum is expensive here, so this is a good option
4. Mom is here to watch the kids so I can try a different version of this recipe.
5. I wanted to because the site I found them on made them sound fantastic!


Back when I had first gotten my Complete Chinese Cookbook, I was thrilled that everything in it turned out so wonderfully (including tonight's dinner, but will post that later).  I was shocked that my steamed buns turned out so poorly.  They weren't awful, but they weren't great.  Hoisin sauce did a lot to help them. They never really grew, and they were a bit heavy. Useful as rocks probably :-)  Luckily, I had enough yeast and flour and alternate recipes to try again.  Those turned out slightly better, but still never really fluffed up.  The dough rose in both cases while it was sitting in the bowl, but not in the steamer.  Of course, I could possibly blame the kids for them, as once again I was a human jungle gym, but then again, perhaps not.

The filling I used in my first attempt, was from the website I linked above.  It was the only good part of the buns. I also filled some with my chicken fried rice that I'd made the night before just for fun, they didn't turn out too bad, but I don't know if it was the filling or the bun that was the problem there....  Anyway, this weekend I tried to make them one last time. And now...I'm hooked!  These were great. They actually doubled in size in the steamer like they were supposed to! The only thing, they're not perfectly shaped as I can't get the crimping down right. Mine have more of a braided look. And they didn't stay white. I think the dough got a bit thin as I was rolling it to save time (rather than pressing). So they have a lovely marbled look. But the texture was good, and the taste was better (they're even good cold for breakfast the next day), so I think all in all, it was a definite win!

You do need to give yourself some time before you want to cook them though as you need to let them rise for about 2-3 hours. Otherwise, making the dough and the filling won't take any longer than anything else.

What you need:


Either 20.4g of cake yeast or 6.4g of the packaged yeast (or 1 Tbls of active dry yeast). I used the 6.4g dried yeast available in Migros and had better luck than with the cake yeast.
About 300ml of warm water (added slowly so you may not need as much)
4 cups flour
2 Tbls sugar
1 tsp baking powder - I added this after kneading for a while and then kneading again.
1 tsp salt.

For the filling
300-350g ground pork
1/2 cup chopped Chinakohl (Chinese Cabbage)
1/4-1/2 cup green onions
2 Tbls (low sodium) soy sauce
1 Tbls seasame oil
1 Tbls dry sherry

Extra sesame oil for coating the bowl
Steamer (if you don't have a bamboo one, you can use one of the fold-open metal veggie steamers)
Baking (or wax) paper - cut these into squares to place your buns on while cooking.

To make the buns, mix the flour, sugar, salt and dry yeast together. A little at a time, add the warm water until it forms one large, slightly sticky, ball.  Put some flour on a work surface, and knead the ball for 2-3 minutes. Flatten it out and add the baking powder. Knead about 5-6 more minutes, until the dough is smooth. I probably should have kneaded it a bit longer, but there were no bits flaking off and my hands were tired, so I stopped here.

Pour some sesame oil into your bowl and swirl it around to coat.  Put your kneaded dough in the bowl and flip it around a few times to coat. Then place some plastic wrap or a towel on top and place it in a warm place and let it double in size. About 2-3 hours. Mine sat for 3 hours.
While the dough is rising, you can prepare the filling so that it is ready to go.  First, thinly slice your scallions. 
 Second, thinly slice your cabbage
 Finally, add the ground pork and liquids.  Mix well and put in the fridge.
You could probably use whatever veggies you have - bean sprouts, water chestnuts, bok choy...I'm looking forward to experimenting with these. 

After your dough has risen, roll it out and then slice it in to sections, I made 16 and ended up with enough filling to have made 17. 

Press out one of the portions into a circle. You can do this by hand, or use a small rolling pin. The goal is to have the edges slightly thinner than the center. If you use a rolling pin (like I did this time) and roll it too thinly, your sauce will seep through a little. 
 Place about 1 1/2 tsp of filling in the center of the circle.  Then pinch the edges together at the top to make it look like a drawstring bag.  I couldn't get these to stick, so I pinched in the sides, alternating them, and ended up with a braided look.
You will need to have your baking (or wax) paper squares ready to set your buns on.  Turn them seam side down so that the top is smooth. 

If you make larger buns, and use a lot of filling, you will need to precook the meat as the steaming may not cook it through all the way. However, doing it as described above, the steaming is plenty to cook the meat, so add it raw. 

Place the buns in your steamer.  Make sure there is room around them to allow for expansion.  I was able to put 3 buns on each layer.  Put some water in a pan (I used a wok) and make sure the level is below that of your lowest buns. Turn the heat to high and cook for 15 minutes (keep an eye on your water level as you may need to add a bit more) Be careful lifting the steamer out, and allow them to sit for a few minutes before removing.  

I served the buns with rice, the rest of the cabbage cooked with some soy sauce, and hoisin sauce. Hope you enjoy! (sorry for the bad picture - had been planning to take another with better light but forgot). 
The nice thing about these is that you can reheat them and they taste just as good, or you can eat them cold.
If you are making plain steamed buns to add bbq pork to, you can also get creative and turn them into little animal shapes (like with the Zopf bread)


Sunday, April 8, 2012

Great Fried Rice in Zurich

Ok, so there are 2 places that I know of that have great fried rice.  Two others I thought had really good fried rice until I discovered the other 2 (the fried rice at these two is still good, I just feel that the other two are better).  If you want to go out and buy it, it will run you about 12 chf. Your other option is to make it, and I have finally found a great recipe for it. More on that in a little while.

First, I've had fried rice at two different restaurants in the Zurich area.  Hua Hin Thai in Wollishofen, and Lily's in Zurich, a little way behind the Hauptbahnhof.  I thought both of them were decent, compared to some of the others that I've tried.  I really like Hua Hin Thai better. We used to live nearby, and the waitstaff was excellent and so were the other dishes. Lily's was rather full and expensive for what you got, though if you haven't been, it's worth going to.

My next experience with fried rice was on a walk around the lake over near the Chinagarten.  I liked this place so much that I was willing to walk from the Wollishofen side of the lake all the way around to it with my one month old son. Took us about two hours. Yes, it's that good.  The only problem is that it doesn't seem to be open all the time, or maybe it was a fluke that the one time I convinced my friends to go it was closed.  Here's a picture of it
Definitely worth it.  They have lots of other things as well, and make it for you after you order it.  Plenty of grass to sit on, or down next to the lake.

The other place I've tried is more convenient, but not as consistent.  It's the Chiang Mai Thai Shop that I mention in my shopping page.  They have different things daily, so you may have to call to find out when they have it, but it seems to be once a week, but different days.  The food is excellent and the shop is a great source for your cooking needs.

On to the easiest of your options.  I was given a fantastic cookbook for Christmas, and have made quite a few things for it. Happily, most of the ingredients are readily available at Coop/Migros, and if not, then the Asian stores are not to far away.  If you like to cook Chinese food, I suggest the Ken Hom Complete Chinese Cookbook

I haven't followed his recipe exactly, mainly because I'm not a big fan of spicy things, and I haven't been to the Asia store in a while, so don't have everything, though I have found some alternatives.

What you need:
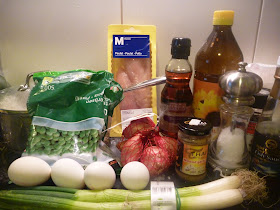
about 2 cups of long grain white rice
100g fresh or frozen peas (I like the gartenerbsen)
3 Tbls vegetable or peanut oil, divided in half
3 Tbls finely chopped shallots (about 2 large ones)
2 Tbsp freshly chopped garlic (or, you can buy a jar at the Asia store and keep it in your fridge to use)
1 Tbsp finely chopped ginger (Coop/Migros)
3 Tbsp chopped green onions - white part
3 Tbsp chopped green onions - green parts
250g chopped (bite sized pieces) chicken - I use whatever is on sale
salt and pepper
4 eggs, beaten
2 tsp sesame oil
1 Tbsp fish sauce, or if you have it:

1 Tbsp chili bean sauce or paste (hubby uses sweet chili sauce mixed in to his serving)
2 tsp shrimp paste or sauce

I suggest having everything grouped together in the order that you need to add it, pre-chopped, diced, and beaten.  It makes it easier when it seems like you are in a rush to stir everything before things have the chance to burn.

Pre-cooking steps:

1. You can make the rice the day before if you would like. Otherwise, you need enough time for the rice to cool completely and be refrigerated.  You want it to be cold before you use it.

To make the rice, measure it into a pot, pour some water in and then strain the water out. Do this until the water runs clear.  Pour more water in until it covers the rice. Add as much as it takes to put your finger on the top of the rice and have the water come up to your knuckle (about a cup of water per cup of rice).  Cover and bring to a boil.  Turn down to the lowest setting and cook for about 15 minutes. The top of the rice will look a bit pockmarked.  Turn off the heat and let sit with the cover on for another 5 minutes.

Take the rice out and lay it on a cutting board or a large plate. Big enough to spread out all the rice so that it can cool.  Once cool, put in a bowl and place in the fridge until cold and ready to use.

2. Cook your peas if they are fresh or defrost them if they are frozen.

3. Chop or dice all your ingredients.

4. Combine the eggs with the sesame oil and a pinch of salt in a bowl. Beat until blended with a fork

Steps:

1. Heat a large wok (a pan will work if you don't have one as long as it's large) over high heat.  Add 1/2 of the oil, and when it starts to smoke slightly, add the shallots, garlic, ginger and the white parts of the onions. Stir for one minute.


2. Add the chicken, 1 tsp of salt and 1/2 tsp of pepper and continue to cook for another 3-4 minutes, or until the chicken is done.


3. Remove and put on a plate/bowl.  Wipe out the wok/pan


4.  Reheat the wok until hot and add the other 1/2 of your oil. Turn the heat down to medium and add the egg mixture. Stir for about 2 minutes, until cooked.  Add the rice and cook for another 3 minutes, mixing well and chopping the egg into small bits as you go.


5. Add the peas, and cooked chicken. Add whichever sauce you have chosen (I only add the fish sauce since that is what I have, but the original recipe calls for the chili bean sauce and shrimp paste). Cook and mix for another 5 minutes.


6. Add the green parts of the onions, cook for a minute until well blended and then serve.


And enjoy!  It's even great the next day, cold out of the fridge!
Make this a side dish by leaving out the chicken.
Instead of chicken, use shrimp or pork as well. So many possibilities!


Saturday, April 7, 2012

Quick and easy Cinnamon rolls (biscuits)

Yet again, something on Pinterest has caught my attention and led me to a new blog, Taste and Tell.  I've seen a lot of great looking recipes, but one in particular caught my attention as I was looking for things to make for breakfast over the Easter holiday weekend.  I chose the Cinnamon Biscuits. I've made my Grandma's Cinnamon Rolls once, about 2 years ago, and they took forever to make!  I ended up with about 3 dozen rolls as well.  I made the dough from scratch which is why it took so long. One day, when the kids are older and I have some time, I'll try again, because they really are good.
One thing about living here is the lack of convenience in some things.  However, I think this is also a good thing. One, because you don't really need to eat cinnamon rolls every weekend, and that would be super easy to do in the US - buy a can and you're ready to go! Two, by learning to use local ingredients, hopefully you cut down on your grocery costs.

These are quite good. There are a few changes I'd make, but nothing major.  Normally I would use the Natron and Backpulver, but couldn't find my supply, so fell back on the Baking Powder and Soda that I have - something you can buy online at one of the specialty shops.  When I made Banana Bread and used the Natron, I actually thought it came out better than with the other, so I am curious to make these again once I have been shopping.

I've never had cinnamon rolls without the icing before. These you pour milk on top of.  When they come out of the oven, they are slightly dry, so I think adding some icing wouldn't really help.  However, with the addition of the milk, it softens them up and the texture is great.

What you need:
2 cups flour (I use weissmehl)
1 Tbls baking powder
1/4 tsp baking soda
1 tsp salt
1/4 tsp vegetable oil (I use sonnenblumen oel)
3/4 cup buttermilk (buttermilch - available at Coop)
75g of butter, soft enough to spread over dough
1/2 cup brown sugar (or muscavado)
2 tsp cinnamon
1/4 tsp ground cardamom
1/3 cup of milk for pouring over the top


Preheat the oven to 204 C. Grease a small round pie/cake tin with some of the butter.

Combine the flour with the salt and baking powder/soda.  Mix in the oil and add the buttermilk.  Mix until it has just come together


Place the dough on a lightly floured surface and knead until smooth, about 2-3 minutes.  Roll into a rectangle, somewhere in the range of 9x13 and then spread the butter on top.

After combining the cinnamon, sugar and cardamom in a bowl (mixing well!), sprinkle on top of the butter.


Fold over the long end of the dough to begin a roll, and keep rolling till you reach the end.  Pinch the edges together slightly to hold everything together.  Cut into 8-10 slices depending on the size of your roll and your pan.  Be aware that they will expand some.


Bake until lightly browned, about 15-20 minutes. 


Pour the milk on top, allow to soak in, and then serve warm. 

Enjoy!


Wednesday, April 4, 2012

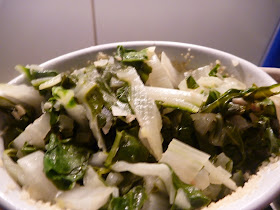
Migros recipes - Bratwurst and a cheesy veggie

I've been getting the Coop and Migros magazines/flyers/newsletters - whatever you call them - in the mail.  Sometimes I glance through them, and sometimes they end up being used as packaging material.  Lately I've been looking in them though. There are coupons inside and recipes.  Can't believe I haven't looked sooner.  I figure any recipe I find in the Coop or Migros stores/catalogs are bound to be a lot cheaper than trying to create something from home that probably requires 6 chf/100g worth of meat.

Normally I translate bits and pieces of a recipe, but this time I didn't bother.  I thought my German was coming along well enough that I could try without it.  I will post the original recipe in German, and also a rough translation of it for you. The only thing I didn't do was keep all the juices to go in with the sauce, but it still ended up being tasty.  I also used only 400g of the vegetable since there were only 2 of us eating.  Be aware that it does cook down.

What you need: To serve 4
Butter for your mold, or large dish
2 Tbls bread crumbs
800 g cabbage stalks
1 onion
2 garlic cloves
1 Tbls oil
salt
1 dl white wine
1 dl vegetable bouillon
2Tbls butter
2 Tbls flour
1.5 dl cream
pepper, nutmeg
80 g Gruyere
4 pork sausages.  I actually did a combination of Cervelas and Kalb brautwurst

1. You can use either several small molds or one large dish to cook this in.  I chose the small dishes (have to keep finding uses for the ones I bought in Mullhouse!).  Butter the dish - like you would a cake pan, and then drop a spoonful of the breadcrumbs in.  If you use the breadcrumbs that Migros sell, which I did, then they are like little granules. Just swish them around in the dish until they have coated the butter.

Chop the cabbage up.  The stalks into 2 cm wide pieces, and the leaves into 2cm wide strips.

2. Dice the onion and garlic and saute in oil.  Add the cut cabbage stalks, white wine and broth.  Cover and cook for about 5-10 minutes, until the stalks are softened. Add the cut cabbage leaves and mix briefly.  Remove the cabbage mixture from the pan, saving the juices.


3. Preheat the oven to 220 C.  Melt the butter and add the flour. Mix well and add the juices. Bring to a boil, then turn down to a simmer for 5 minutes.  Add the cream, pepper and nutmeg to taste. 


Put the cabbage mixture in the dish(es) and then add the cream sauce to the top.  Grate the Gruyere cheese on top and then place in the oven for about 15-20 minutes.  


Meanwhile, cook your sausages. 
Enjoy.  

And here is the recipe in German as I may not have translated it correctly.  From this weeks Migros magazine: (sorry about the lack of umlauts) 
Butter fuer die Form
2 EL Paniermehl
800g Krautstiele
1 Zwiebel
2 Knoblauch  zehen
1 EL Oel
Salz
1 dl Weisswein
1 dl Gemuese bouillon
2 EL Butter
2 EL Mehl
1,5 dl Rahm
Pfeffer, Muskatnuss
80g Greyerzer
4 Schweins bratwuerste

1. Eine grosse Form oder mehrere kleine, ofenfeste Formen mit Butter bepinseln und mit Paniermehl ausstreuen, Krautstielblaetter von den Staengeln schneiden. Staengel in 2 cm grosse Stuecke. Blaetter in circa 2 cm breite Streifen schneiden.

2. Zwiebel und Knoblauch hacken im oel anduensten. Krautstielstaengel dazugeben, salzen. Mit Weisswein und Bouillion abloeschen und zugedeckt circa 5-10 Minuten bissfest garen. Krautstie blaetter daruntermischen.

3. Backofen auf 220C vorheizen. Krautstiele abgissen, Kochsud auffangen. Butter erhitzen, Mehl darin anduensten. Kochsud dazuglessen, Sauce aufkochen und ca. 5 Minuten unter Ruehren koecheln lassen. Rahm dazugeben. Sauce mit Pfeffer und Muskat abschmecken. Krautstiele in die Form geben, Sauce ueber das Gemuese glessen. Mit Greyerzer bestreuen. Krautstiele in der oberen Ofenhaelfte 15-220 Minuten ueerbaken.

4. In der Zwischenzeit die Schweinsbratwuerste braten und zu dem Krautstielgratin servieren.


Tuesday, April 3, 2012

Pesto and Tomato Chicken Sandwich

A few years ago I found great pre made, ready to eat chicken tenders in Coop.  Every year I have looked for them again, but can't find them.  I know with Betty Bossi, many things are seasonal...like large potatoes for baking, pizzas with special toppings, etc.  I've tried making many of these things myself, but sometimes its just not the same.  Using the raclette potatoes just isn't quite the same as having one good sized baking potato!

However...this time, I think that it worked.  I am still trying to streamline breakfasts and lunches, and this is another in my path to daytime happiness.

What you need:
1 package of chicken tenders. Mine had 7
1 Sun dried tomato for every piece of chicken (7)
1 Tbls of pesto - more if you are using more chicken
Olive oil
Rolls


Put the chicken in a bowl and roughly chop up your tomatoes. Basically cut them into as big or as small a bite as you would like. Add the tomatoes.  Add the pesto and mix.  If it is too dry and not mixing well, add 1/2-1 Tbls of olive oil.  Cover and let marinate in the fridge for at least 1 hour, but overnight if you wish.

When ready to cook, just tip the entire contents of the bowl into a frying pan.  Cook on high heat for about 3-4 minutes and then flip. Cook for another 3-4 minutes. Cover and turn down the heat to low. Let cook another few minutes until the chicken is cooked thoroughly.


With the addition of the oil, there is no need to add anything to the bread, but of course feel free if you would like to.  I have had it with onion sprouts and I think it is great that way.  I just didn't have any on hand this time.  You could also try cucumber. You can serve this as a warm or cold sandwich.  The first day it's usually warm and the following, it's usually cold :-)  The rolls I'm using I found at Coop Sihlcity.  Just slice them in half and stick them in the toaster.


Enjoy.