Sunday, July 29, 2012

The fluffy bakery cookies (Lofthouse Cookies)

If you`ve lived in the US, I`m sure you`ve come across them.  Those fluffy cookies with the bright icing, covered in sprinkles.  The ones you can get in the bakery section that are lucky to make it home and are gone in seconds.

Well, while perusing Pinterest yet again for dinner ideas, I came across a blog that made them from a blog and so on and so on (they`re that good!), and decided to try them as well.  They deliver. However, you need to have patience.

I ended up with about 60 cookies. It wasn´t very hard, just a bit time consuming as for some reason I started right before dinner as well and had to take a break.  You could try halving the recipe if you want, and I ended up with extra icing...of course some of my first iced cookies may not have quite as much as the end ones, but you would still end up with some extra icing.

There are a few suggestions...one is to make the dough, then roll it partially out and freeze for about 2 hours to make it easier to work with and not dry.  My freezer is no where near big enough for the dough of 60 soon to be cookies...unless it was empty, but with a recent trip to France for groceries, that isn`t likely...
I lightly floured the surface of a cutting board and then the top of my dough and then the rolling pin, and I was fine.  I did end up putting the rest of the dough in the fridge for an hour or so, but that didn`t make any difference..still as sticky as when I began.  I did not, however, have a problem with any dryness.

I will admit I have not made tons of cookies from scratch, however, these were really fluffy.  Kind of like the scone dough, or tortillas...they would start to spring back to their original lump when I was rolling the dough.

The other suggestion, or recommendation, is to let the cookies sit for a few hours (after icing), so that all their flavors can reach their greatest potential.  So yeah...making cookies and I`m not going to try them?? Not likely.  I was willing to experiment though.  I tried one without icing, and will have to admit I was not very impressed. After icing, I tried one and it was better.  An hour later we tried another and it was a little better.  They were left to sit overnight in sealed bags (again, no Tupperware big enough), and I tried one this morning (who says you can`t have cookies for breakfast), and they were fantastic.

So, if you have patience and want some yummy cookies, this is the cookie for you!

p.s. Sorry about the pictures...my camera is hiding somewhere again

What you need:
For the dough:
6 cups flour
1 tsp baking soda
1 tsp baking powder
1 cup (200g) butter, room temperature
2 c sugar
3 eggs
2 tsp vanilla extract
1 1/2 c sour cream

(sorry had already creamed the butter here)

For the icing:
1 cup (200g) butter, room temperature
1 tsp vanilla extract
4 cups powdered sugar
6 Tbls heavy cream - vollrahm

food coloring and sprinkles if desired


Cream the butter and sugar together. Add the eggs, one at a time, and mixing well in between. Add the vanilla and sour cream. Mix.


Add your dry ingredients.  The dough is going to be gooey/sticky like you haven`t added enough flour, but is ok.


Lightly flour your work surface and put 1/4-1/2 of the dough on top. Sprinkle with flour and roll out to about a 1/4 in thickness. I used a 2 inch cookie cutter.


Put parchment (baking) paper on your cookie sheet and place in a 425 F (220 C) oven for about 7 minutes. You want a pale golden color.  I`m not really sure what that is, so I left mine until they started changing color on the edges a bit.  Still about 7 minutes though.  Immediately transfer them to a cookie rack to cool. They will slide right off.  And keep going till all your cookies are done.

The cookies need to be completely cool before you ice them, so I waited until they were baked and then about an hour before making the icing.

Cream the butter and the vanilla, and then slowly add in your sugar. Add the cream and  your color last if you are using any.


I used a knife to swirl the icing on the cookies, and then my toddler happily sprinkled them with sprinkles.


Like I mentioned above, these are best after sitting for about 3-4 hours (or overnight). Once the icing has set, you can put the cookies in a container or bags, layering with parchment paper.


Recipe I used from here

Friday, July 13, 2012

Carrot soup with cream and roasted pistachios or Karroten creme mit gerösteten Pistazienkernen

Carrots. Rabbits.  That`s what I think of when I see carrots.  I`m not a huge fan.  My mom used to have a bag of carrots for us to snack on after school.  For some reason, they always made me hungrier.  I don`t mind them, really, but I do not like cooked carrots at all.  Anytime they are mixed in with a meal, I will pick them out.  I don`t know what it is about them....

Maybe I am getting older (well, I know I am), or being in a different country is encouraging more of a `just try it`attitude, but when I tried the carrot soup for the first time a few weeks ago*, I did not think I would like it at all.  Boy was I wrong.

What you need:

1 kg of carrots, peeled, ends chopped off and cut into chunks
1 onion, peeled and roughly chopped
1 or 2 cloves of garlic, minced
1 liter of vegetable bouillon
enough sugar to glaze the carrot and onion tops
vollrahm to whip or Schlagrahm
50-75g butter
pistachio kernels
salt and pepper to taste.


In a pan, melt about 25g of the butter. Chop the carrots and onions, but don`t worry about making them small as you will blend them at the end.  Briefly saute, then glaze with sugar and mix.


Put the bouillon in a large pot and add the carrots and onions.  Add the garlic, salt and pepper, and another 25g of butter.  Simmer for about 30 minutes, or until the carrots are tender and allow a fork to easily pass through them.


If you are using vollrahm, use a whisk to beat it up until thickened.  About 2 minutes (with an electric one).


Briefly saute the pistachios in some more butter. Set aside.


Remove the pan from the heat and using an immersion blender, blend up the chunks until everything is smooth.


Pour into a bowl and top with the cream and pistachios.  Serve immediately as the cream will start melting quickly.


I think it tastes best when the cream is then mixed into the soup.


Enjoy!

*Also a cooking class find, though as we are not given measurements most of the time, I may have been a little off.

Sunday, July 8, 2012

Apple cake

Living in the US made me want to make things conveniently... buying prepackaged dinners, buying take out, and definitely baking from mixes.  While I still do bake from mixes, I have found some recipes that allow me to think the end result is worth the effort.  This recipe was one of the simplest ones I`ve seen, did not require a lot of effort, and tasted fantastic.    Which makes it even better!

This was the dessert from our cooking class earlier this week, and since I didn`t get many pictures, so I made it today so I could post it.


What you need:
125g butter
125g sugar
200g flour
2 tsp baking powder
3 eggs
1-4 Tbls milk (I used 2)
2 green apples, cut into slices
lemon zest (didn`t have any, so I used a squirt of lemon juice)


Cream the butter and then add the sugar.


Add the flour and baking powder, stir.
Add the eggs and mix well.  Add the milk and pour into your prepared pan.

In class, we used a 25cm Springform pan, but as I don`t have one, I used one of my many cake pans. This one is a 10 in, 2 in deep pan. I used a piece of baking paper, coated with butter to prevent sticking, in the pan. It worked beautifully.  The cake came out very easily, both out of the pan (make sure you have enough extra paper to lift), and out of the paper.  I removed it while it was still warm.
and the one from class, with a springform pan:


Peel the apples and cut them into slices. Arrange them on top of the cake batter, pressing down slightly.

Bake at 200 C for 35-40 minutes.  It only took mine 35 minutes.  You can check to see if it is done by inserting a toothpick.  If the toothpick comes out clean (through the thickest point of the cake), it is done.
I sprinkled some sugar on top
This is the one from class (I added a few more apples to mine):


Serve with ice-cream.  Another suggestion, I wish I had thought of before baking, but will try again, is to melt some caramel and swirl it into the cake batter. Should be great. Guess there`s my reason to make it again.

Super simple! Enjoy!


Thursday, July 5, 2012

Potato leek gratin and a side of lamb

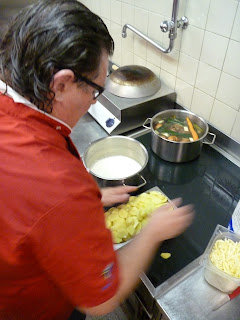
The main course of our cooking class meal consisted of lamb, accompanied by a potato leek gratin.  The lamb was seared on both sides and then cooked for a very short time. The old time mustard was spread on it, along with some breadcrumbs, and then it was allowed to sit in a heated compartment at 70 C.  Now I don`t know about you, but I don`t have a warmer at home.  I would probably sear it on each side on the stove and then turn the heat down and put a lid on until it reached a doneness I was happy with...but that`s just me.

The potato gratin, however....that was definitely good enough to deserve it`s own post.  There were 10 of us, so you may want to adjust the amounts accordingly.  I don`t have much else to say about it, except that it was great!  I have added pictures of the lamb at the end as well.

What you need:
1 kg potatoes, peeled and thinly sliced
A mixture of Gruyère and Emmantaler cheeses, grated, about 250g (or more if you would like it extra cheesy)
Sprinz cheese for topping
4 eggs
500 ml milk
200 ml cream (vollrahm)
salt and pepper to taste
1 small diced onion
2 leeks, thinly sliced
Pinch of ground or freshly grated Nutmeg (muskatnuss)

Put the milk in a large pan and add the potatoes.  Cook them for about 10 minutes on high, then add the sliced leeks.


Add half of the cheese. Add salt, pepper and a pinch of nutmeg.
Add in the cream and 4 eggs

Mix quickly so that your eggs do not scramble.  Add in the rest of the cheese. Mix well. 
Pour into a buttered dish and sprinkle the Sprinz on top. Put into the oven at 160 C for about 40 minutes. Turn up to 220 C until the top becomes a nice crispy golden brown. 


Making the lamb


The finished dish


Once again, this is some of the fantastic food you can enjoy at Restaurant Gleis 1 in Thalwil.

Wednesday, July 4, 2012

Boiled beef with egg vinaigrette

Our cooking classes have been going on for some time now, and though sadly I`ve only been able to make 3 of them, they are a ton of fun. It`s a great way for picky me to try a variety of new things that I would never think about making from a cookbook.  Last time, it was carrot soup with cream and pistachios. Not something I would try, but it was excellent. I will make it soon and post the recipe.

This time, we made a beef appetizer that was absolutely fantastic. We also made a leek potato gratin that we thought looked so great that we convinced him to make one more. Lamb was also on the menu. Unfortunately I am not a fan, especially of rare lamb..or any rare meat for that matter, but most everyone else seemed to inhale it, so I`m sure it was good as well!  For dessert, there was an apple tart that was light and fluffy...will be making that again as well!  I will be breaking this post up into sections so it is not too long.

On to what you`ve been waiting for...recipes. Now I haven`t made this at home yet, but I did help make it, and I have enough pictures I think for you to see what`s going on.  If you live near Thalwil, you should definitely stop in at Restaurant Gleis 1, say hi, and have something to eat.

Boiled Beef with a homemade vinaigrette and egg

What you need for the beef:

 A large piece of beef, not of great quality as you will be boiling it for about 2 hours.
1 Celeriac bulb, cubed
1 leek, green part only
2 onions, sliced in half
5 cloves of garlic, peeled and crushed
3 bay leaves
3 peeled carrots
water

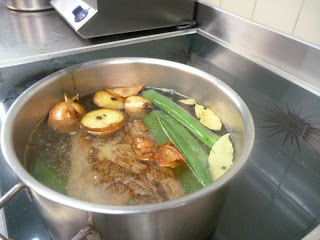
Fill a large stock pot with water, enough that it will cover the piece of beef you have, along with some room left for your vegetables. Heat on medium.

Cut the green part of the leek off and toss it in the water, add the bay leaves


In a large pan, add some oil and sear the beef on both sides so that it is a nice brown color. Put it in the water.  Cut your onions in half, leaving the skin on. Put them cut side down in the same ban and briefly sear them. Add them, as well as your garlic to the water.


 Add your carrots
Peel your celeriac and cut it into cubes. Add to the water. 

Simmer for 2 hours, or longer as needed for the beef to be tender. The left over water will become a wonderful bouillon. 


You can make the beef a day ahead if you would like. We were told that the vinaigrette also goes well with whatever left over meat you happen to have for a nice cool summer dinner. 

To make the vinaigrette you will need:

1/2 cup Mustard
3/4 cup Red wine vinegar
3 small pickles
1 - 2 Tbsp capers
1/2 cup pearl onions
3 hard boiled eggs
4 boiled, peeled and diced tomatoes
fresh chives
drizzle of olive oil
salt and pepper to taste

Take out the stem part of the tomatoes and put it into a small part of boiling water for 2 minutes. Peel the skin from them and then dice them. 

Dice the pickles, onions and capers.

In a mixing bowl, put your mustard and vinegar. Mix well. 
Add the pickles, onions and capers. Mix well. Add the tomatoes. 
Dice the eggs and add them, and then slice the chives and add them as well. Mix well and then add a little bit of olive oil. Serve on top of the beef. 

And here is the final product, with the addition of some melon balls.