Showing posts with label Asian. Show all posts

Monday, February 11, 2013

Smoked Salmon Sushi Squares


Last week, I went out one evening with some friends for dinner, so decided to surprise my hubby with a special sushi dinner. He thought it was fantastic. It was really quite simple, though some of the prep work took a while, it wasn`t the kind that you have to stand in the kitchen and watch over, so it was easy to do other things. The total time was probably about 15 minutes of creating the dish. 

If you`d like to use something other than salmon, you can make with pretty much anything flat (or that is squish-able). 


What you need: 
500 g sushi rice
3 Tbls rice vinegar
1 Tbls sugar

1/3 cup of mayonnaise
1 tsp liquid hot sauce (I used Thai hot chili sauce from Migros, but the original recipe calls for Sriracha)
1/2 tsp sesame oil

1 bag of rucola, I found some mixed with wasabi leaves (Coop)
1 package of smoked salmon
1 green onion (scallion)

soy sauce for dipping
plastic wrap
square baking dish, or something to create one
a heavy book

First cook your sushi rice so that it can cool. Once cooked, add the rice vinegar and sugar and mix well. Let cool. 

Next, find something square, or a small rectangular pan. I used a small baking dish with a box of raclette potatoes taking up the other half to create the size I wanted.  Lay a piece of plastic wrap in each direction, leaving enough excess so that you can cover the sushi when complete. 


Once the rice is cool, press half of it on to the bottom of your plastic wrapped dish. 


Mix together the mayonnaise, sesame oil and hot sauce, and then spread half on the rice. 


Next, layer on some leaves and then cover with salmon. 


Repeat the process again, so that you have 2 layers of everything. Fold the plastic wrap up over the sushi and lay a heavy book or two on top. Press for at least an hour and then slice into small squares. After each cut, wipe your knife clean with a damp paper towel to clean it and make it easier to cut neatly. 


Thinly slice a green onion and sprinkle on top of your cut sushi. Serve with soy sauce. Enjoy!


This recipe came from My Japanese Table


Thursday, August 16, 2012

Pork Steamed Buns

A few weeks ago, I went to Germany, to Singen, and I found refrigerated steamed buns. I was so excited. So I bought some and then they sat in the fridge for a few days while I tried to figure out what to make. I had found some pork on sale, so decided to use that, and had remembered a recipe for steamed buns with pork.  Well, apparently not for boneless pork chops, but since that is pretty much all I will buy here as it is less expensive than other pork cuts, I went with it.  I have a feeling the crispy pork belly would have been fantastic, but I was pleased with this as well.

I also discovered steamed buns in Konstanz yesterday, so was thrilled with that...now to make breakfast steamed buns...after I buy a new steamer as mine decided it had had enough just recently. I hear the New Asia Market in Wiedikon has steamed buns as well, but have not made it over there yet to check.  The Asia store in HB has not on the times I have visited (though they do have lots of other good things).


If you can not find steamed buns, or want to make your own, I love the taste of the buns that I made earlier. Check out the recipe here.  I still need to perfect my closing (mine were filled), but they do taste great.

What you need:
 Steamed buns, either bought or made with the recipe above
Pork, about 500 g

For the marinade:
1 1/2 Tbls soy sauce
1/2 tsp Chinese 5 spice
1/4 tsp white pepper
3/4 tsp salt
1/2 tsp sugar


hoisin sauce, enough to spread on all the buns
thinly sliced cucumber
thinly slice scallions
koriander for garnishing


Mix the marinade ingredients together and put in a bowl.


Make slices in the pork. Brush the marinade onto the pork, making sure to get it into the slices.


Surround with foil and let sit for 30 minutes

Put in the oven at 200 C for about 40 minutes, or until the pork is cooked through. Once you have removed the pork, slice into thin strips.


Prepare your steamer: put enough water in a large pan so that it will not touch the bottom of the buns. Place the buns on top of a piece of parchment paper so they do not stick.  Once the water starts to boil, cook about 10 minutes, depending on the size of the bun.

Spread some hoisin sauce, pork slices, scallions and cucumber. Add a cilantro leaf (or two).  Enjoy!


Monday, July 2, 2012

Dumpling wrappers

If you`re living in Switzerland, Zürich in particular, you know it can be a challenge to find some ready made things that make your dinner life easier.  I`ve already shown you how to make easy, great tasting tortillas, and   steamed buns for dim sum, so now I will add into the mix, dumpling wrappers. The Asian Store is just not close enough for me to check and see if they have them when I decide I want to make dumplings on the spur of the moment.  However, if you live nearby, check it out and let me know please...I`ll get back down there eventually.

This is super easy.  All you need is flour and water. A rolling pin and a round cookie cutter (or glass)

I made a double batch. This is what you need:
2 Cups flour
1/2 cup water
additional flour for rolling out the dough


Combine the flour and water and knead for about 5 to 10 minutes - until the dough is not sticky.  Let the dough rest for 30 minutes, covered with a damp towel.

Divide the dough into 4 parts and roll them into cylinders.  Cut each cylinder into about 8 pieces.

Roll the cut pieces, one at a time until flat, and then use a 2.5 inch cookie cutter or glass to make them into a circle.

That`s it!  Cover with a damp cloth until ready to use.


Filled and ready to cook


Wednesday, June 20, 2012

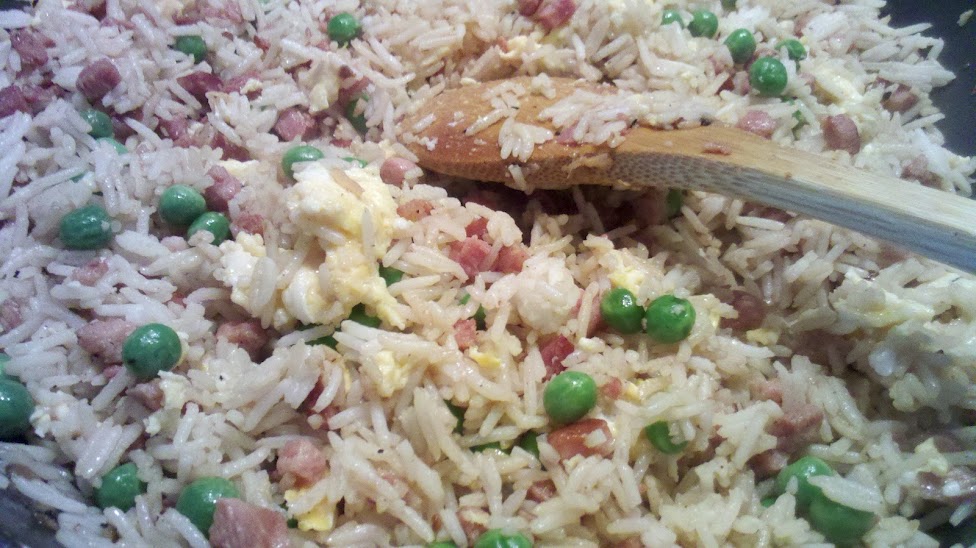
Fried Rice made simple

I know I gushed about the fried rice I made a while back, and I still really love it.  This one is different, really good and a lot simpler to make.  Also hubby liked it better.  I think I still prefer the other one, but on the nights you don`t have a lot of time, this is the way to go.
This is from another cookbook I was given for Christmas - Easy Chinese Recipes, Bee Yinn Low.  There are a lot of ideas that include store bought items that I cannot find here. However there are also a few basic recipes given - in case you have time to make them yourself - or in my case, if something isn`t available.
Oh - and sorry for any odd characters or misspellings...I finally got a German keyboard after my laptop died and I`m still getting used to where all the keys are.

What you need:
500g white rice. Cooked and cooled
2 1/2 Tbls oil - I used sesame
3 eggs, beaten
3 cloves minced garlic
150g speckwürfeli
80g frozen peas


Seasoning:
1/2 Tbls soy sauce
1 1/2 Tbls fish sauce (Coop or Migros)
1/4 tsp sesame oil
3 dashes white pepper (I bought mine at the Turkish grocery store)

Mix all into a bowl and set aside.


Heat up a wok or large skillet, add 1/2 Tbls of oil and add the eggs. Cook until they are just done and break into pieces. Put in a small bowl or plate.


Add the remaining oil to the wok and add the garlic. Cook until light brown.  Add the speckwürfeli (ham) until slightly browned and then add the peas.  Mix well and then add the rice in.

Mix in the seasonings and then add the egg.  Mix continuously for about 3 minutes. Add salt to taste, however since I used the full sodium soy sauce, I did not add any extra salt.

Serve immediately and enjoy!

Monday, April 30, 2012

Simple Stirfry

I once again visited my fabulous cookbook while my mother was visiting. A great time to try new recipes that may take a while to make...but that was not so in this case.  It was a very simple stir fry. You could of course expand on it, but sometimes, simpler is better.  And everyone loved it. Even my littlest one who has come over to steal the leftovers away from me now...

You need 15 minutes of marinating time. Of course, you can leave it longer if you have time earlier in the day.

I always buy the boneless pork chops for dishes requiring pork - either the thin butterfly halves, or the thicker ones, depending on what I'm making. Coop's 'Prix' brand has been working out quite well...you get a little more for your money and adding all the flavors, I think it tastes great (probably until I visit the US again and buy a better cut...but that's for later...)

I served this with white rice, however will make it with brown next time.  I have also doubled the sauce

What you need:
About 500g of pork - I used 560
2 Tbsp dry Sherry
2 Tbsp soy sauce
4 tsp sesame oil
2 tsp cornstarch
8 green onions (I used 7)
1 Tbsp peanut/vegetable oil
2 tsp sugar
salt and pepper to taste


In a bowl, combine the Sherry, soy sauce, sesame oil and cornstarch. Slice the pork into short, thick strips and add to the bowl. Let marinate a minimum of 15 minutes.


Heat a large frying pan or wok with the peanut/vegetable oil.

Cut the green onions diagonally (the entire onion) and set aside.

When the oil is steaming, add the pork mixture and liquid.  Fry until the pork is browned.  Add the onions, sugar, salt and pepper.  Continue to cook about 4-5 more minutes until the pork is done.


Remove immediately and serve.  Pour the juice into a small bowl to pour over the rice and pork mixture.

And it's that simple! Enjoy.


Tuesday, April 24, 2012

Steamed Buns in Zurich

I know I've said it before, but I'm really loving trying new recipes out here. Especially since Grandma (my mom) is here to play with the kids. It's definitely a lot easier to cook something new when you don't have kiddos hanging on you wanting your attention at the exact moment you are supposed to be doing 5 things at once.

I tried making these steamed buns for a few reasons.
1. Hubby likes them.
2. Thought I could entice my toddler to try something new by calling them rolls.
3. Dim Sum is expensive here, so this is a good option
4. Mom is here to watch the kids so I can try a different version of this recipe.
5. I wanted to because the site I found them on made them sound fantastic!


Back when I had first gotten my Complete Chinese Cookbook, I was thrilled that everything in it turned out so wonderfully (including tonight's dinner, but will post that later).  I was shocked that my steamed buns turned out so poorly.  They weren't awful, but they weren't great.  Hoisin sauce did a lot to help them. They never really grew, and they were a bit heavy. Useful as rocks probably :-)  Luckily, I had enough yeast and flour and alternate recipes to try again.  Those turned out slightly better, but still never really fluffed up.  The dough rose in both cases while it was sitting in the bowl, but not in the steamer.  Of course, I could possibly blame the kids for them, as once again I was a human jungle gym, but then again, perhaps not.

The filling I used in my first attempt, was from the website I linked above.  It was the only good part of the buns. I also filled some with my chicken fried rice that I'd made the night before just for fun, they didn't turn out too bad, but I don't know if it was the filling or the bun that was the problem there....  Anyway, this weekend I tried to make them one last time. And now...I'm hooked!  These were great. They actually doubled in size in the steamer like they were supposed to! The only thing, they're not perfectly shaped as I can't get the crimping down right. Mine have more of a braided look. And they didn't stay white. I think the dough got a bit thin as I was rolling it to save time (rather than pressing). So they have a lovely marbled look. But the texture was good, and the taste was better (they're even good cold for breakfast the next day), so I think all in all, it was a definite win!

You do need to give yourself some time before you want to cook them though as you need to let them rise for about 2-3 hours. Otherwise, making the dough and the filling won't take any longer than anything else.

What you need:


Either 20.4g of cake yeast or 6.4g of the packaged yeast (or 1 Tbls of active dry yeast). I used the 6.4g dried yeast available in Migros and had better luck than with the cake yeast.
About 300ml of warm water (added slowly so you may not need as much)
4 cups flour
2 Tbls sugar
1 tsp baking powder - I added this after kneading for a while and then kneading again.
1 tsp salt.

For the filling
300-350g ground pork
1/2 cup chopped Chinakohl (Chinese Cabbage)
1/4-1/2 cup green onions
2 Tbls (low sodium) soy sauce
1 Tbls seasame oil
1 Tbls dry sherry

Extra sesame oil for coating the bowl
Steamer (if you don't have a bamboo one, you can use one of the fold-open metal veggie steamers)
Baking (or wax) paper - cut these into squares to place your buns on while cooking.

To make the buns, mix the flour, sugar, salt and dry yeast together. A little at a time, add the warm water until it forms one large, slightly sticky, ball.  Put some flour on a work surface, and knead the ball for 2-3 minutes. Flatten it out and add the baking powder. Knead about 5-6 more minutes, until the dough is smooth. I probably should have kneaded it a bit longer, but there were no bits flaking off and my hands were tired, so I stopped here.

Pour some sesame oil into your bowl and swirl it around to coat.  Put your kneaded dough in the bowl and flip it around a few times to coat. Then place some plastic wrap or a towel on top and place it in a warm place and let it double in size. About 2-3 hours. Mine sat for 3 hours.
While the dough is rising, you can prepare the filling so that it is ready to go.  First, thinly slice your scallions. 
 Second, thinly slice your cabbage
 Finally, add the ground pork and liquids.  Mix well and put in the fridge.
You could probably use whatever veggies you have - bean sprouts, water chestnuts, bok choy...I'm looking forward to experimenting with these. 

After your dough has risen, roll it out and then slice it in to sections, I made 16 and ended up with enough filling to have made 17. 

Press out one of the portions into a circle. You can do this by hand, or use a small rolling pin. The goal is to have the edges slightly thinner than the center. If you use a rolling pin (like I did this time) and roll it too thinly, your sauce will seep through a little. 
 Place about 1 1/2 tsp of filling in the center of the circle.  Then pinch the edges together at the top to make it look like a drawstring bag.  I couldn't get these to stick, so I pinched in the sides, alternating them, and ended up with a braided look.
You will need to have your baking (or wax) paper squares ready to set your buns on.  Turn them seam side down so that the top is smooth. 

If you make larger buns, and use a lot of filling, you will need to precook the meat as the steaming may not cook it through all the way. However, doing it as described above, the steaming is plenty to cook the meat, so add it raw. 

Place the buns in your steamer.  Make sure there is room around them to allow for expansion.  I was able to put 3 buns on each layer.  Put some water in a pan (I used a wok) and make sure the level is below that of your lowest buns. Turn the heat to high and cook for 15 minutes (keep an eye on your water level as you may need to add a bit more) Be careful lifting the steamer out, and allow them to sit for a few minutes before removing.  

I served the buns with rice, the rest of the cabbage cooked with some soy sauce, and hoisin sauce. Hope you enjoy! (sorry for the bad picture - had been planning to take another with better light but forgot). 
The nice thing about these is that you can reheat them and they taste just as good, or you can eat them cold.
If you are making plain steamed buns to add bbq pork to, you can also get creative and turn them into little animal shapes (like with the Zopf bread)


Sunday, April 8, 2012

Great Fried Rice in Zurich

Ok, so there are 2 places that I know of that have great fried rice.  Two others I thought had really good fried rice until I discovered the other 2 (the fried rice at these two is still good, I just feel that the other two are better).  If you want to go out and buy it, it will run you about 12 chf. Your other option is to make it, and I have finally found a great recipe for it. More on that in a little while.

First, I've had fried rice at two different restaurants in the Zurich area.  Hua Hin Thai in Wollishofen, and Lily's in Zurich, a little way behind the Hauptbahnhof.  I thought both of them were decent, compared to some of the others that I've tried.  I really like Hua Hin Thai better. We used to live nearby, and the waitstaff was excellent and so were the other dishes. Lily's was rather full and expensive for what you got, though if you haven't been, it's worth going to.

My next experience with fried rice was on a walk around the lake over near the Chinagarten.  I liked this place so much that I was willing to walk from the Wollishofen side of the lake all the way around to it with my one month old son. Took us about two hours. Yes, it's that good.  The only problem is that it doesn't seem to be open all the time, or maybe it was a fluke that the one time I convinced my friends to go it was closed.  Here's a picture of it
Definitely worth it.  They have lots of other things as well, and make it for you after you order it.  Plenty of grass to sit on, or down next to the lake.

The other place I've tried is more convenient, but not as consistent.  It's the Chiang Mai Thai Shop that I mention in my shopping page.  They have different things daily, so you may have to call to find out when they have it, but it seems to be once a week, but different days.  The food is excellent and the shop is a great source for your cooking needs.

On to the easiest of your options.  I was given a fantastic cookbook for Christmas, and have made quite a few things for it. Happily, most of the ingredients are readily available at Coop/Migros, and if not, then the Asian stores are not to far away.  If you like to cook Chinese food, I suggest the Ken Hom Complete Chinese Cookbook

I haven't followed his recipe exactly, mainly because I'm not a big fan of spicy things, and I haven't been to the Asia store in a while, so don't have everything, though I have found some alternatives.

What you need:
about 2 cups of long grain white rice
100g fresh or frozen peas (I like the gartenerbsen)
3 Tbls vegetable or peanut oil, divided in half
3 Tbls finely chopped shallots (about 2 large ones)
2 Tbsp freshly chopped garlic (or, you can buy a jar at the Asia store and keep it in your fridge to use)
1 Tbsp finely chopped ginger (Coop/Migros)
3 Tbsp chopped green onions - white part
3 Tbsp chopped green onions - green parts
250g chopped (bite sized pieces) chicken - I use whatever is on sale
salt and pepper
4 eggs, beaten
2 tsp sesame oil
1 Tbsp fish sauce, or if you have it:

1 Tbsp chili bean sauce or paste (hubby uses sweet chili sauce mixed in to his serving)
2 tsp shrimp paste or sauce

I suggest having everything grouped together in the order that you need to add it, pre-chopped, diced, and beaten.  It makes it easier when it seems like you are in a rush to stir everything before things have the chance to burn.

Pre-cooking steps:

1. You can make the rice the day before if you would like. Otherwise, you need enough time for the rice to cool completely and be refrigerated.  You want it to be cold before you use it.

To make the rice, measure it into a pot, pour some water in and then strain the water out. Do this until the water runs clear.  Pour more water in until it covers the rice. Add as much as it takes to put your finger on the top of the rice and have the water come up to your knuckle (about a cup of water per cup of rice).  Cover and bring to a boil.  Turn down to the lowest setting and cook for about 15 minutes. The top of the rice will look a bit pockmarked.  Turn off the heat and let sit with the cover on for another 5 minutes.

Take the rice out and lay it on a cutting board or a large plate. Big enough to spread out all the rice so that it can cool.  Once cool, put in a bowl and place in the fridge until cold and ready to use.

2. Cook your peas if they are fresh or defrost them if they are frozen.

3. Chop or dice all your ingredients.

4. Combine the eggs with the sesame oil and a pinch of salt in a bowl. Beat until blended with a fork

Steps:

1. Heat a large wok (a pan will work if you don't have one as long as it's large) over high heat.  Add 1/2 of the oil, and when it starts to smoke slightly, add the shallots, garlic, ginger and the white parts of the onions. Stir for one minute.


2. Add the chicken, 1 tsp of salt and 1/2 tsp of pepper and continue to cook for another 3-4 minutes, or until the chicken is done.


3. Remove and put on a plate/bowl.  Wipe out the wok/pan


4.  Reheat the wok until hot and add the other 1/2 of your oil. Turn the heat down to medium and add the egg mixture. Stir for about 2 minutes, until cooked.  Add the rice and cook for another 3 minutes, mixing well and chopping the egg into small bits as you go.


5. Add the peas, and cooked chicken. Add whichever sauce you have chosen (I only add the fish sauce since that is what I have, but the original recipe calls for the chili bean sauce and shrimp paste). Cook and mix for another 5 minutes.


6. Add the green parts of the onions, cook for a minute until well blended and then serve.


And enjoy!  It's even great the next day, cold out of the fridge!
Make this a side dish by leaving out the chicken.
Instead of chicken, use shrimp or pork as well. So many possibilities!