Showing posts with label breakfast. Show all posts

Friday, August 16, 2013

Cinnamon Swirl Bread


This, unfortunately, did not make it through a day. Next time, I would suggest making two loaves...that way you have at least a chance to freeze one for later...or to enjoy for the next day`s breakfast.

I made the icing that you would normally put on top of a cinnamon roll with this, but it did not really need it. Also, the longer it sat, the better it tasted...which was difficult to do!

I saw this recipe on Pinterest, but it had been modified a few times from the Pioneer Woman`s website, so I decided to go straight to the source to modify it myself. She has many fantastic recipes, but I`ve only made a few so far.

What you need: (seriously, go ahead and make 2 loaves right away, you won`t be disappointed)

1 cup milk (I used skim)
 6 Tbls butter
12.5 g (about 2 packages) hefe (yeast)*
2 eggs
1/3 cup sugar
3 1/2 cups of flour
1 tsp salt

For the inside:
1/3 cup sugar
2 Tbls cinnamon

1 egg for brushing over the top
softened butter

*If you have Active Dry Yeast available, check the original source for the amount

On medium-low heat, put the milk and butter in a pot. Heat until thoroughly melted and mixed, but do not boil. Let cool enough that you can touch it, but don`t let it get to room temperature. Add the yeast packet and mix gently. Let sit while doing the next part.


In a large bowl, add the sugar and eggs. Mix well


Add the milk, butter and yeast mixture. Stir until combined. 


 Mix the flour and salt together in a bowl. Add 1/2 at a time to the sugar and egg mixture. Beat until well combined before adding the second half.


Continue to mix well until the dough is relatively un-sticky. About 10 minutes. If you don`t have an electric mixing bowl with the dough attachments, it is easiest if you knead by hand (which I did)


If it is still sticky, keep mixing and add a little flour at a time. In a clean bowl, add a little räpsol (canola) to coat the bowl so the dough doesn`t stick. Roll the dough around so it is coated. Cover with plastic wrap and put in a warm spot to rise. Let sit for 2 hours


On a large, clean surface, roll the dough into a rectangle. You can measure it against your loaf pan, so that it is no wider than the pan. Roll it out to about 45-60 cm (18-24 in). Use your softened butter to smear over the length of it. 


Mix the cinnamon and sugar together. You will have a lot, but make sure you use all of it when sprinkling over the buttered dough. I didn`t, and wish I had. 


Starting at the end farthest from you, roll the dough, as tightly and evenly as you can, towards you. Don`t worry if it is not perfect, as it will all be jammed into the loaf pan anyway :)


Using some more of your softened butter, coat the loaf pan and then place the dough, seam down, inside. 


Sadly, you must now cover it with plastic wrap again for another 2 hours. Don`t worry though, you are almost done!

See how nicely it rose again?


Lightly beat an egg and brush it over the top. 


Heat your oven to 180 C and bake on a middle - low rack for 40 minutes until nice and brown. 


Remove from the pan (this is where the butter comes in as it should just tip out) and let cool. 


This is where you must make a decision...let everyone know it`s done (unfortunately they will probably smell the yummy-ness) or enjoy the first slice yourself. If you want to freeze it, let it cool completely first. Thaw it on the counter to enjoy. 


Saturday, February 23, 2013

Gingerbread Waffles


Waffles...yum.  These are something good that work great as a breakfast or great as a cold snack during the day. Even my son who doesn`t like regular waffles is more than happy to eat these, so an extra bonus for me.

It does take a while to make, but you can leave the batter in the fridge for up to a day, so if you don`t want to make all the waffles at once, you can store the remainder of the batter. If you are more in a pancake mood, then just add a little milk to thin the batter.

What you need:
4 eggs
1/3 cup sugar
1 c melasse (molasses for those of you with access to it), bought mine at Coop
1 c buttermilk
3 cups flour
2 tsp ground ginger
1 1/4 tsp cinnamon
3/4 tsp salt
2 tsp baking soda (natron)
2 tsp baking powder (backpulver)
1/2 c unsalted butter, melted

For the toppings you can use syrup, whip cream, fruit, or powdered sugar.  I think they are great cold with nothing, and warm with just syrup.


In a large bowl, add the flour, spices, salt, soda and powder. Mix well and set aside.


In another bowl, beat the eggs until fluffy. An electric mixer works best, but you can always do it by hand. Add the sugar, buttermilk and melasse.  I don`t bother to measure it, I just pour it from the jar as it is so sticky. Mix well.


Slowly add the dry ingredients, half at a time and mix between. Add the butter and mix until the batter is smooth. (I know mine shows butter chunks, but I have let it get soft and it mixes quite quickly)


You can either cover the batter and leave it in the fridge for a day, cook all of it immediately and have leftovers for snacks, or some of each.

Make sure you spray your waffle iron (or rub on a cooking butter) so the batter doesn`t get stuck. Cook for about 4 minutes, or a little bit longer than your waffle iron says is done to get a nice brown finish. I end up with about 30 waffles, but this will depend on your waffle iron.


Enjoy!


Saturday, June 23, 2012

French Toast for Father`s Day

So Father`s Day was a few weeks ago.  I like to make the hubby something that he particularly enjoys to try and make the day special for him. He loves French Toast and pretty much only gets it when his mom visits or he visits her...so not often.  I think I`ve made it once in the almost 5 years we have been living here.  Not because I don`t want him to have it, but because it makes so much and he is really the only one who enjoys it.

That being said, this recipe worked out great because it was easy to have it again the next day for him. He said that he really liked this version of it, so if you like French Toast, definitely give it a try.

The main difference is that instead of bread, you use Angel Food Cake as the base. Now if you are lucky and live somewhere where the mixes are available, you have it easy. Or you could buy it on one of the American food websites I have listed.  If you would like to be adventurous, I found two recipes that look promising for making it yourself.  Here is the first, in English, and the second, in German. I will get around to making these and give you a review...probably when strawberries are less expensive as they go so wonderfully with an angel food cake.

What you need:
1 Angel Food Cake - either made with one of the recipes above, or a mix
2 tsp vanilla
6 eggs
1 1/2 cups milk
2 tsp vanilla

butter for frying
fruit, syrup for topping


Heat a skillet on medium with the butter. 


Meanwhile, slice the cake into wedges and mix the rest of the ingredients together. Put in a shallow dish.


Soak the slices for at least a minute on each side.


When the butter has melted, add the slices and cook for 2 minutes on each side.


Put on a plate and sprinkle with powdered sugar and drizzle with maple syrup and add fruit if desired.


Store any extra cake in a zip lock bag, and cover any remaining batter and refrigerate.
Original recipe here

Wednesday, May 2, 2012

Scrumptious Scones

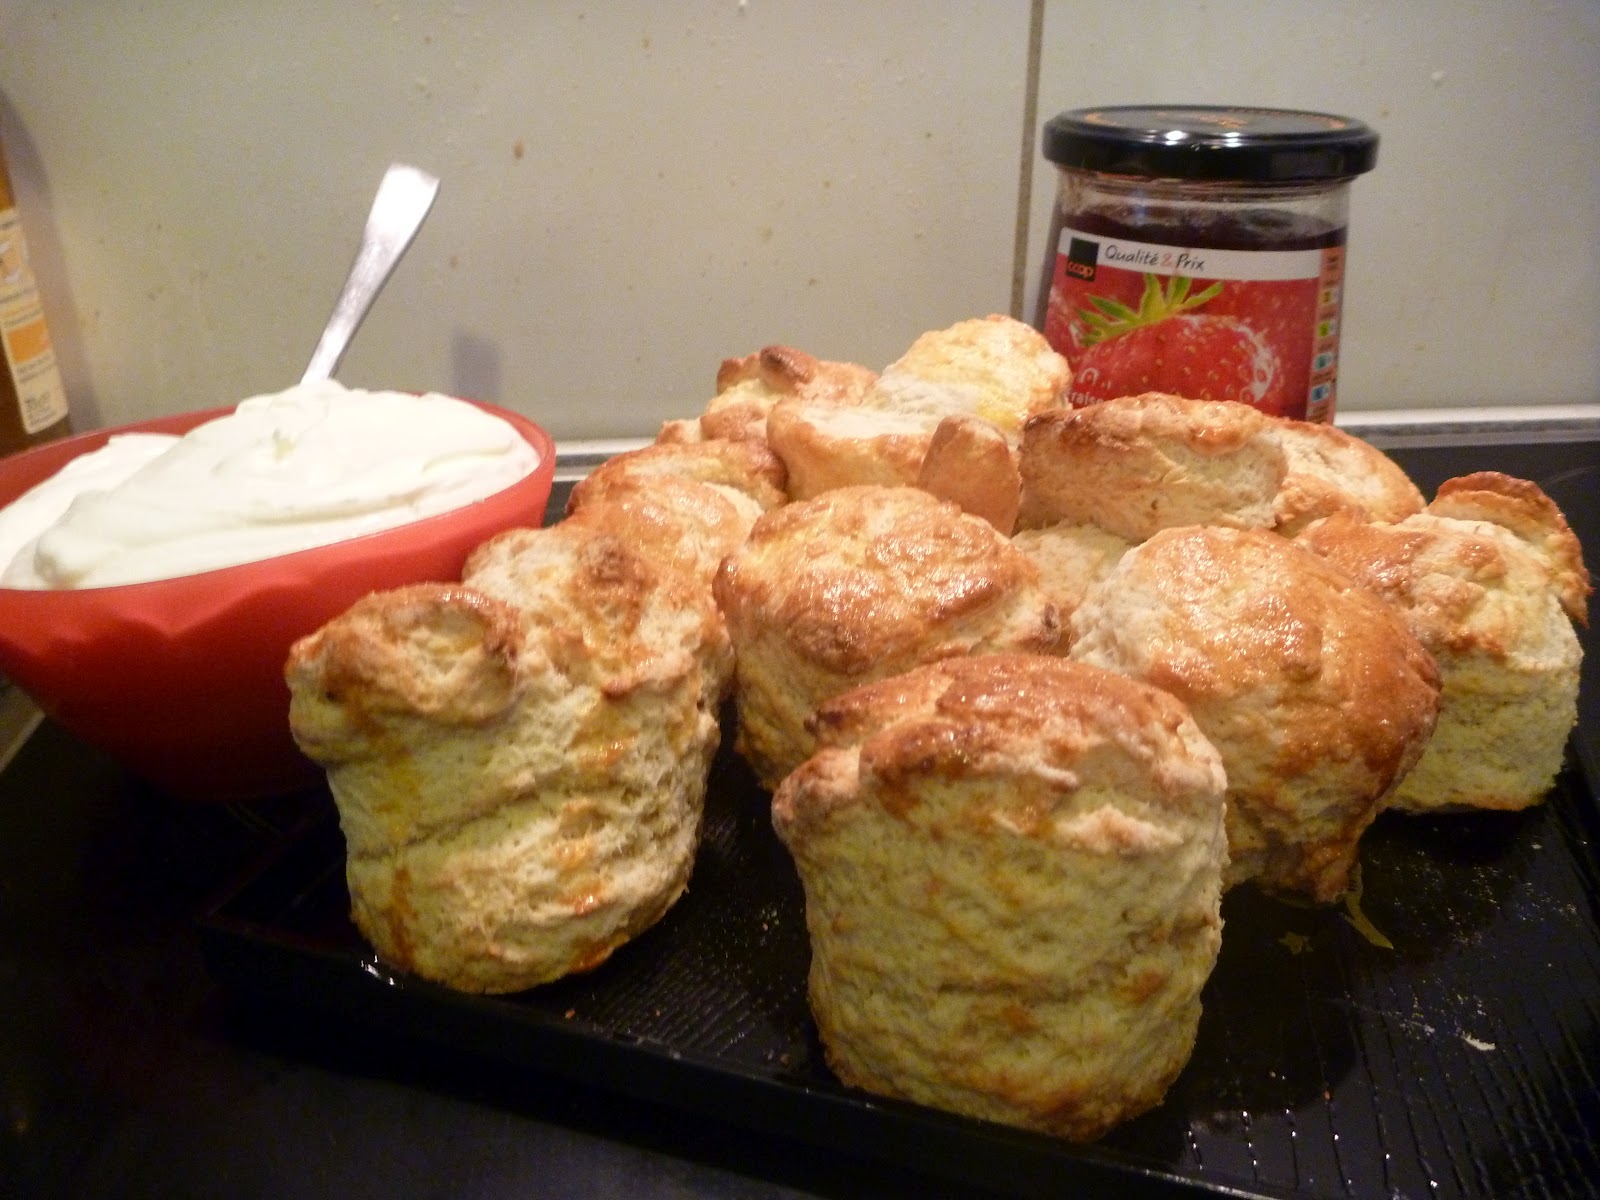
I don't have a lot of American friends here - I mainly have UK or Australian ones, so I'm also picking up new recipes from them in addition to my Swiss ones. Sometimes the terms throw me more than the German ones, and some of the recipes are too bland for hubby (but perfect for me!), but I love, love, love these scones.  So did hubby - especially when I offered to put the toppings on for him.

I've only had the pre-mixed, blueberry scones in the US before, and I liked those, but these were so much better. And almost as simple to make.  I would like to try putting some blueberries in them though...or maybe it's just bb muffins I'd like...still haven't found the perfect recipe for them. One day.   Oh, and I used all Swiss/German ingredients too. Doubly proud.  Thank you so much for introducing me to these!


The original recipe that I was given can be found here
What you need:
350g flour
1/4 tsp salt
85g butter, cubed
3 Tbsp fine sugar (easily available at Coop/Migros)
175 ml milk
1 tsp vanilla extract (yes, that's the Vodka bottle - I've made my own)
A dash of lemon juice
an egg, beaten, to glaze the top
Jam of your choice - I used Strawberry
150-200ml of Vollrahm (instead of clotted cream)
1 packet of Backpulver* (about 14g, the ones used for 500g of mehl).

Preheat your oven to 220.

In a large bowl, mix the flour, salt and backpulver. Add the butter and mix with your fingers until the dough becomes crumbly.  Add the sugar.
Make a hole in the mixture
In a microwave safe container, measure out 175ml of milk, and heat for one minute.  You want it warm, not hot. Add a dash of lemon juice (or just use a sharp buttermilk, and the vanilla.  Place your baking sheet inside the oven so that it heats up as well.

Pour the milk mixture into the hole and using a knife, mix it in. Don't worry, all the liquid will soak in. 
Place the dough on a lightly floured surface and knead it for about a minute until it is smooth.  Keep it in a round shape, about 1 1/2 inches tall.  You should be able to cut out 4 scones at a time using a 1 1/2 - 1 3/4 inch cutter. 

Carefully put the cutter in the dough (if it's a bit sticky, dip the cutter in some flour first), and pull out your scone.  The dough will be much higher than your cutter. 

As you go, you may find your scones getting a little shorter.  I ended up with 10, if you keep it to 8 they should all be about the same size. 

Brush the tops of the dough with the egg and then place them on the hot pan

While the scones are cooking, you can make your cream. Simply pour your vollrahm into a deep bowl, and using a whisk (I highly suggest an electric one), continue to beat until fluffy - about 10 minutes...which is good, because that's the amount of time needed to cook your scones. They should have risen and be golden on the top.  
 Just out of the oven

Ready to enjoy!  I was informed that the proper way to eat these is jam first, as otherwise the jam slides right off the cream and creates a mess.  Still good though!

* For those of you lucky enough to have a wide range of products to choose from, you can use 350g of self raising flour plus 1 tsp baking powder.


Tuesday, April 24, 2012

Steamed Buns in Zurich

I know I've said it before, but I'm really loving trying new recipes out here. Especially since Grandma (my mom) is here to play with the kids. It's definitely a lot easier to cook something new when you don't have kiddos hanging on you wanting your attention at the exact moment you are supposed to be doing 5 things at once.

I tried making these steamed buns for a few reasons.
1. Hubby likes them.
2. Thought I could entice my toddler to try something new by calling them rolls.
3. Dim Sum is expensive here, so this is a good option
4. Mom is here to watch the kids so I can try a different version of this recipe.
5. I wanted to because the site I found them on made them sound fantastic!


Back when I had first gotten my Complete Chinese Cookbook, I was thrilled that everything in it turned out so wonderfully (including tonight's dinner, but will post that later).  I was shocked that my steamed buns turned out so poorly.  They weren't awful, but they weren't great.  Hoisin sauce did a lot to help them. They never really grew, and they were a bit heavy. Useful as rocks probably :-)  Luckily, I had enough yeast and flour and alternate recipes to try again.  Those turned out slightly better, but still never really fluffed up.  The dough rose in both cases while it was sitting in the bowl, but not in the steamer.  Of course, I could possibly blame the kids for them, as once again I was a human jungle gym, but then again, perhaps not.

The filling I used in my first attempt, was from the website I linked above.  It was the only good part of the buns. I also filled some with my chicken fried rice that I'd made the night before just for fun, they didn't turn out too bad, but I don't know if it was the filling or the bun that was the problem there....  Anyway, this weekend I tried to make them one last time. And now...I'm hooked!  These were great. They actually doubled in size in the steamer like they were supposed to! The only thing, they're not perfectly shaped as I can't get the crimping down right. Mine have more of a braided look. And they didn't stay white. I think the dough got a bit thin as I was rolling it to save time (rather than pressing). So they have a lovely marbled look. But the texture was good, and the taste was better (they're even good cold for breakfast the next day), so I think all in all, it was a definite win!

You do need to give yourself some time before you want to cook them though as you need to let them rise for about 2-3 hours. Otherwise, making the dough and the filling won't take any longer than anything else.

What you need:


Either 20.4g of cake yeast or 6.4g of the packaged yeast (or 1 Tbls of active dry yeast). I used the 6.4g dried yeast available in Migros and had better luck than with the cake yeast.
About 300ml of warm water (added slowly so you may not need as much)
4 cups flour
2 Tbls sugar
1 tsp baking powder - I added this after kneading for a while and then kneading again.
1 tsp salt.

For the filling
300-350g ground pork
1/2 cup chopped Chinakohl (Chinese Cabbage)
1/4-1/2 cup green onions
2 Tbls (low sodium) soy sauce
1 Tbls seasame oil
1 Tbls dry sherry

Extra sesame oil for coating the bowl
Steamer (if you don't have a bamboo one, you can use one of the fold-open metal veggie steamers)
Baking (or wax) paper - cut these into squares to place your buns on while cooking.

To make the buns, mix the flour, sugar, salt and dry yeast together. A little at a time, add the warm water until it forms one large, slightly sticky, ball.  Put some flour on a work surface, and knead the ball for 2-3 minutes. Flatten it out and add the baking powder. Knead about 5-6 more minutes, until the dough is smooth. I probably should have kneaded it a bit longer, but there were no bits flaking off and my hands were tired, so I stopped here.

Pour some sesame oil into your bowl and swirl it around to coat.  Put your kneaded dough in the bowl and flip it around a few times to coat. Then place some plastic wrap or a towel on top and place it in a warm place and let it double in size. About 2-3 hours. Mine sat for 3 hours.
While the dough is rising, you can prepare the filling so that it is ready to go.  First, thinly slice your scallions. 
 Second, thinly slice your cabbage
 Finally, add the ground pork and liquids.  Mix well and put in the fridge.
You could probably use whatever veggies you have - bean sprouts, water chestnuts, bok choy...I'm looking forward to experimenting with these. 

After your dough has risen, roll it out and then slice it in to sections, I made 16 and ended up with enough filling to have made 17. 

Press out one of the portions into a circle. You can do this by hand, or use a small rolling pin. The goal is to have the edges slightly thinner than the center. If you use a rolling pin (like I did this time) and roll it too thinly, your sauce will seep through a little. 
 Place about 1 1/2 tsp of filling in the center of the circle.  Then pinch the edges together at the top to make it look like a drawstring bag.  I couldn't get these to stick, so I pinched in the sides, alternating them, and ended up with a braided look.
You will need to have your baking (or wax) paper squares ready to set your buns on.  Turn them seam side down so that the top is smooth. 

If you make larger buns, and use a lot of filling, you will need to precook the meat as the steaming may not cook it through all the way. However, doing it as described above, the steaming is plenty to cook the meat, so add it raw. 

Place the buns in your steamer.  Make sure there is room around them to allow for expansion.  I was able to put 3 buns on each layer.  Put some water in a pan (I used a wok) and make sure the level is below that of your lowest buns. Turn the heat to high and cook for 15 minutes (keep an eye on your water level as you may need to add a bit more) Be careful lifting the steamer out, and allow them to sit for a few minutes before removing.  

I served the buns with rice, the rest of the cabbage cooked with some soy sauce, and hoisin sauce. Hope you enjoy! (sorry for the bad picture - had been planning to take another with better light but forgot). 
The nice thing about these is that you can reheat them and they taste just as good, or you can eat them cold.
If you are making plain steamed buns to add bbq pork to, you can also get creative and turn them into little animal shapes (like with the Zopf bread)